How To Use The Most Important Features In Google Ads Editor
Google Ads Editor is a free, downloadable application that allows you to conveniently update your Google campaigns in bulk. What could take five hours in the Google ads interface takes mere minutes in Editor.
When I was first introduced to Editor it seemed overwhelming, but with time, it became the only tool I ever needed to effectively run ad campaigns. Once you are an expert at Google Ads Editor, you only need the interface for small changes such as adjusting budgets or search keyword reports.
Here are some time-saving tips in Editor:
Make Multiple Changes

Creating new campaigns can be challenging at times, especially when you are adding hundreds or thousands of keywords at once. One of the most important tools in Editor is the “Make Multiple Changes” option. This allows you to paste data(typically from Excel or Google Sheets) and add them to Google Ads Editor.
Google provides files you can use as a baseline for uploading your ads, the most common of these are keyword or budget templates. This way, you can create everything in Excel and upload them straight into Editor.
When you are writing your ad copy, use the “len” function to count the number of characters for each cell. This allows you to stay under the character limit for Google ads and minimize the number of errors when setting up a new campaign.
Another way I use “make multiple changes” is by changing the daily budget, which is the most useful when you have multiple campaigns with different budgets. Here is an example of how I would use Excel to update budgets in Editor.
- Sign in to your Google Ads account
- Download all of your campaigns into Excel (use MTD data through yesterday)
- Copy the “campaign name” and the “cost” column
- Paste into a separate Excel file
- Use a simple budget formula to get your daily budget. Copy it for every column
- Budget Per Campaign – Spend/Days Left In The Month
- Once you calculate the daily budget, open Editor for the account you are updating
- Download “more data”
- Go to the campaign level and select all campaigns
- Click “Make Multiple Changes” at the top of the page
- Copy the “Campaign Name” and “Daily Budget” columns from Excel
- Select “Paste From Clipboard”
- Click “Process”, if there are no errors then you entered them correctly
- The most common error is when you don’t select the correct column name. It should look like this:
-
- Review your new budgets and select “Keep” if everything looks good. Select “Reject” if the data doesn’t match up correctly
- Click “Post”

Copying New Campaigns
Another useful feature in Editor is having the ability to copy and paste whole campaigns or ad groups. A great way to use this feature is separate campaigns by match type. Here is how you would make a new campaign with a different match type in Editor.
- Copy a campaign that is already built
- Click on the campaign you just copied on the top left.
- Under “Keywords & Targeting>Keywords” click on the first keyword,
- Scroll down to the bottom of the keyword list, then press “Shift>Click or Ctrl>A”
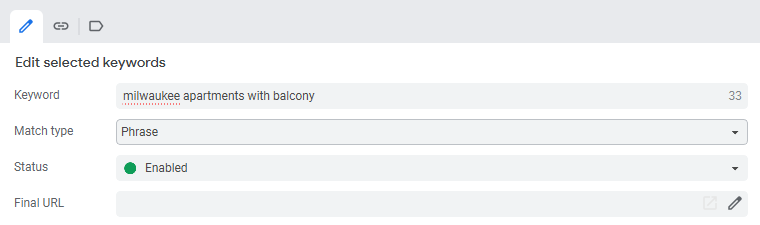
- On the top right under “Edit Selected Keywords” select match type>[Desired Match Type]. This will change the match type of every keyword selected.
Replace Text
This feature is exclusive to Google Ads Editor and is not available in the interface. In Editor, you can replace almost anything, from ad group names to final URLs in ads. In this example, I am replacing “PH” with “EX” since I just copied the phrase match campaign and changed the match type to exact match. You need to specify which field which fields you are replacing and can replace more than one field at a time.
This is the most common way that I use this feature. I would also use it if there are keywords with slight changes that I would need to make. You can also use this to edit the ad copy if you are ending a promotion or changing the messaging.


Updating Ads & URLs
Another common way that we use Editor is to change our ad copy. Can you imagine trying to update your ads or landing page in the interface? You would need to go into every individual ad and change them one at a time. One example is when an e-commerce client has a promotion they want to highlight in their ads. You would want to dedicate one or two headlines of the ad to that promotion. Here is how you update your ad copy in Editor.
- In the bottom left corner click on Ads>[Desired Ad Type]
- Select the ads you want to highlight in the ad list by using Shift + Click on the list of ads you want to edit (I usually sort the ads by Headline 1)
- The list on the right-hand side will let you edit every headline, description, and URL at once for the ads you selected
- If you are trying to change a headline that shows <varies>, check the ad copy of the highlighted ads to make sure you aren’t changing a headline that you don’t want to change
Using Editor Offline
When you download an account all the changes that you make will be offline and will not be on Google Ads until you post the changes. This is a unique feature only available in Google Ads Editor and is useful if you don’t have access to the internet. Note that these changes won’t be live until you have access to the internet again and hit “Post” in the top right corner. Make sure to download the account before you are offline so you have the most up-to-date changes. In the most recent update to Editor, you can now schedule post uploads for any future date.
Google Ads Editor is a fantastic tool that will end up saving you hundreds of hours on your Google ads campaigns. This is one of the many ways our team at Granular saves time and allows us to focus on strategy for our clients. If you are not using Google Ads Editor, what are you waiting for? Download it today and you will never need to individually edit your campaigns again. Let us know some of the ways that you enjoy using Editor in the comments below!
