How to Change Attribution Settings in Meta Ads
Accurate attribution is the key to unlocking actionable insights from your Meta Ads campaigns. Without it, you might misjudge performance or leave optimization opportunities on the table. Fortunately, Meta Ads Manager provides customizable attribution settings for Leads and Sales campaign objectives that allow you to track and analyze conversions effectively. This guide will help you master attribution settings to ensure your campaign reporting aligns with your strategic objectives.
What Is Attribution in Meta Ads?
Attribution is the process of determining which ads—and which user interactions—get credit for driving a conversion. When you run campaigns, users may click an ad, view it, or interact with it and then convert days (or even weeks) later. Attribution settings define the lookback window (the timeframe after an ad interaction) during which a conversion is credited to that ad. While there’s no perfect attribution setup for Meta, we’ll show you how to edit your attribution settings below. From there, it’s all relative – meaning that once you set a source of truth you can make better data-driven decisions from that point forward.
Why Are Attribution Settings Important?
Attribution settings impact:
- Data Accuracy: Ensuring you correctly measure ad effectiveness.
- Campaign Optimization: Helping identify the best-performing campaigns and ads..
- Budget Allocation: Allowing for better investment decisions.
If your attribution settings don’t match your sales cycle or user behavior, you may overvalue or undervalue certain ads. Adjusting these settings ensures that the data you base decisions on is as truthful and complete as possible. We often see eCommerce, CPG, clothing, and consumable products have shorter sales cycles. While B2B, large ticket items, larger decision items (like school, housing, jobs) take longer to close so those would need a more generous longer term attribution setup.
Steps to Change Attribution Settings in Meta Ads
Follow these steps to update your attribution settings:
- Access Meta Ads Manager: Sign in and choose the relevant ad account.
- Create or Edit Your Campaign/Ad Set: Either set up a new campaign or open an existing one. If you need to change attribution on a currently active ad set, duplicate it, then adjust before publishing.
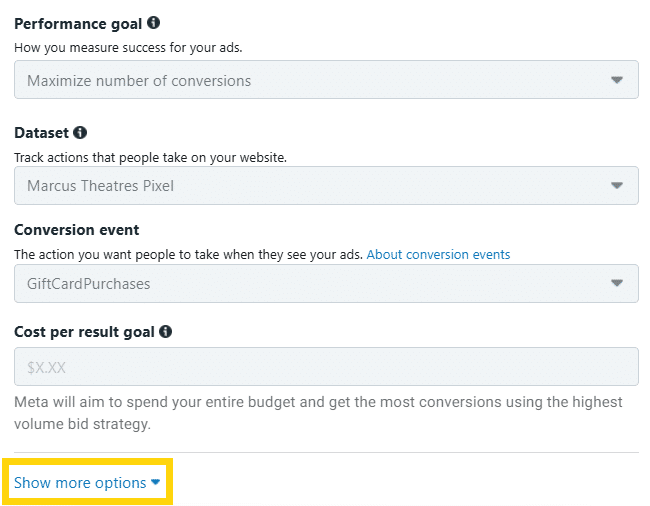
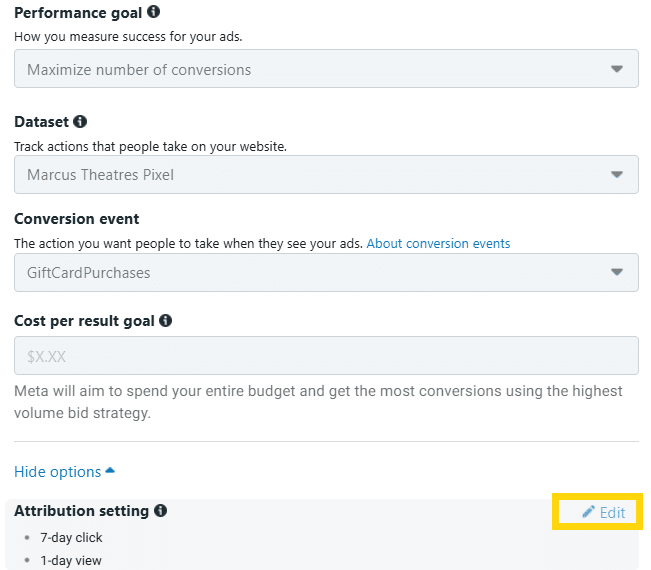
- Locate the Attribution Setting: Within the ad set, find the “Attribution Setting” or “Attribution Window” option. If it’s not immediately visible, click “Show More Options.”


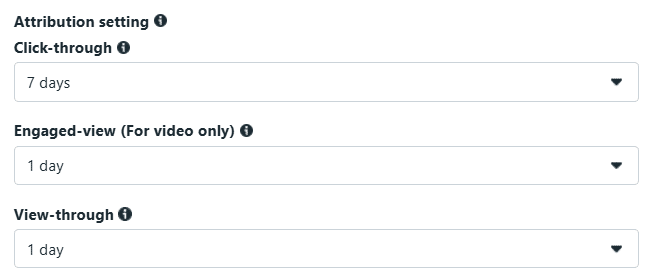
- Choose Your Attribution Window: From the dropdown, select from the available windows—such as 1-day or 7-day click, 1-day view, or 1-day engaged view—based on your campaign goals.

- Publish Your Changes: Once you’ve selected the appropriate attribution window, click “Publish” to finalize and apply your new settings.
Choosing the Right Attribution Window
The attribution window you select affects how conversions are tracked and reported. Here’s a quick guide:
- Click-based Windows (1-day or 7-day): These are best if you want to credit conversions that occur relatively soon after someone clicks on your ad. Short windows (1-day) suit quick conversions (like impulse purchases), while longer windows (7-day) are better if your sales cycle takes more time.
- View-through (1-day): If conversions can happen shortly after someone sees (but doesn’t click) your ad, a 1-day view-through window may help you understand the impact of impressions.
- Engaged-view (1-day): Suitable for video-based campaigns where a user watches a portion of the video (at least 10 seconds) and then converts within a day. Keep in mind this setting isn’t available for app ads.
- Combination Windows: Best for comprehensive tracking of various user behaviors.
When choosing an attribution window, consider your target audience’s decision-making process, the complexity of your product, and your overall campaign goals.
Best Practices for Adjusting Attribution Settings
- Test Different Settings: Use Meta’s “Compare Attribution Settings” feature to analyze how various windows affect performance data.
- Avoid Frequent Changes: Altering settings too often can disrupt reporting consistency.
- Understand Reporting Impacts: Changing attribution windows can make it tricky when you view historical data through a different attribution lens. Be sure you know what the attribution windows are both for active and historical campaigns.
Common Pitfalls to Avoid
- Ignoring Cross-Device Conversions: Ensure your settings account for users switching devices during their journey.
- Mismatched Settings to Campaign Goals: Align attribution windows with the timeline of your desired conversions.
- Don’t Overrely on View Conversions: While view-through and engaged-view attribution can highlight the awareness value of your ads, relying too heavily on them may inflate perceived performance.
Resources for Further Support
For more detailed guidance, visit the Meta Business Help Center. Additionally, consider third-party tools to enhance your attribution tracking and automate data analysis.
Attribution settings are not just another checkbox in your Meta Ads Manager; they’re a foundational component of effective campaign tracking and optimization for your business. By fine-tuning these settings, you empower your marketing strategies with clearer insights and better outcomes. Start now—log in to Meta Ads Manager and ensure your attribution settings align with your business goals. For expert guidance and deeper insights into marketing strategies, be sure to reach out using the “Get Granular” button below. Better tracking means better results, and we’re here to help you achieve them!
Questions?
If you have any questions or are interested in having Granular help grow your business, please use the button below to get in touch!
