Google Ad Customizers: Part 2
Ad Customizers Part 2
In part one of this three-part blog post, I shared how Ad Customizers are superior to DKI. We are still waiting on statistically significant data to prove our point. In the meantime, below is some helpful information on how to implement.
How to Implement
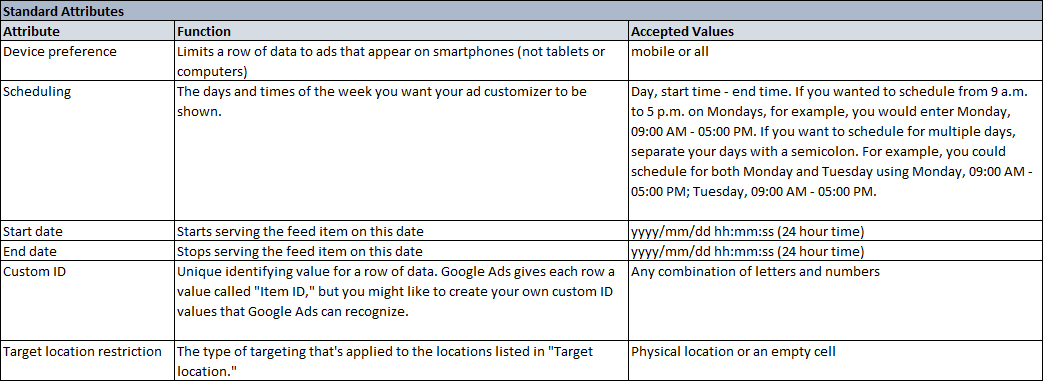
To implement these in your own campaigns, you’ll need Google’s ad customizer data template. You’ll need to define the attributes that will change within your ads; the custom attribute types allowed are text, number, price, or date. The attribute type will need to be included in the header of the custom attribute as well. You can also use standard attributes, such as limiting them to only appear on smartphones, a custom ID or Item ID, the days and times of the week to run, or a start or end date for the ad customizers.

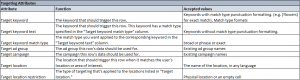
Next, you’ll define the (optional) targets. This will trigger Google to change the attributes. Targets include the keyword, keyword text + match type, ad group, campaign, user location, and the type of targeting for user location.
Now fill out the sheet to match your strategy. In this example, we used a Target Location of Kansas City, MO to substitute geographically specific headlines, descriptions and paths, which we named HeadlineLocation, DescriptionLocation, and PathLocation. Make sure the text within these attributes does not exceed the character limit for where you’re inserting them.
In the example below, you can see how you can upload multiple locations to swap out different texts. Right now, we’ve got those marked for the system to ignore by putting # in the front of the row. To quickly fill in the rows, we used concatenation to put the location name into each row, and then went back to edit any that went over the character limits.

Once you’ve completed the spreadsheet, navigate to Tools > Business data, click the plus sign, and up load the file under Ad Customizer data. The name you give your data set (DataSetName below) will be referenced in the parameters for your ads, so keep it short and sweet and no duplicates. You can also edit your values within the platform without having to reupload a sheet each time.
Now you can create ads with the customizers. Use the format {=DataSetName.AttributeName} for your customizers, with DataSetName being the name of the file you just uploaded, and AttributeName matching the column within the file that you want your ad text to be changed to. Always include a non-customized ad in the same ad group, as a control and in case something goes wrong.
What you type into the ad copy: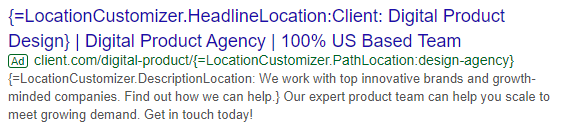
What non-Kansas City users see:
What users in Kansas City see:
Additionally, if you have a column for the end date, you can use the Countdown function to dynamically show how many days are left for a sale or promotion. This would look like {=COUNTDOWN(DataSetName.AttributeName)}, where the AttributeName is the name of the column containing the date. These will show in your ad counting down by day, then by hour, then by minute. You can set these dates right from the ad copy editor itself by just typing in {, selecting Countdown and filling in the date, but if you’ve got multiple sales that you’d like to switch out without having to edit each time one begins or ends, ad customizers are the way to go.


For more information, see Google’s help articles about ad customizers, how to set up ad customizers, about keyword insertion, and the names to use for geo targeting options.
Check back soon for the final installment of this Google Ad Customizers.
